If you’re getting into web development, databases are about to become your new best friend. They’re like the hidden vaults that store all the important data behind your website—user profiles, site settings, content, and so much more.
Think of them as the brain of any data-driven site, handling everything that makes your website function the way you want. Now, if you’re using MySQL, learning to manage your database in cPanel is one of those skills that’ll make you look (and feel) like a pro.
It’s not just about control; it’s about ensuring your site runs smoothly and securely. In this guide, we’ll show you exactly how to create a new MySQL database and a database user in cPanel, so you’re set up for success from the start!
What is cPanel?
cPanel is a widely-used web hosting control panel that simplifies various tasks, including website management, file handling, and database setup.
By using cPanel, website owners can easily access all hosting services, making it ideal for both beginners and professionals.
To get started, log in to your cPanel dashboard, where you’ll see a wide array of tools available, including the MySQL Database Wizard.
Why is MySQL Database Essential for Your Website?
A MySQL database is essential for storing and retrieving data in web applications. Whether it's an e-commerce platform, a blog, or any other dynamic website, MySQL databases are vital. They store essential information, enabling features such as user logins, comments, and product listings.
Getting Started with MySQL in cPanel
cPanel offers two primary ways to create a MySQL database: MySQL Database Wizard and MySQL Databases. The Wizard provides a guided step-by-step process, while the other option allows more control for experienced users.
How to Create a New Database in MySQL Using cPanel "Manage Databases"
To create a new database, follow these steps:
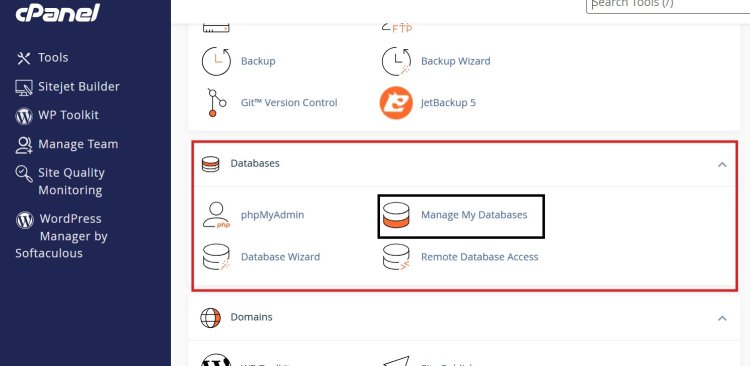
Step 1: Login to cPanel and navigate to the Databases section.

Step 2: Select Manage Databases.
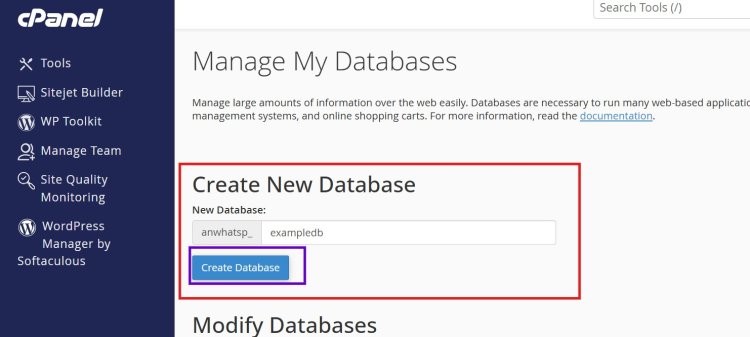
Step 3: Enter a name for your database, keeping it relevant and concise.
Step 4: Click Next Step to proceed.
Tip: Choose a naming convention that makes it easy to identify the database, like including part of the website name.
Creating a MySQL Database User
After creating the database, it’s time to add a user:
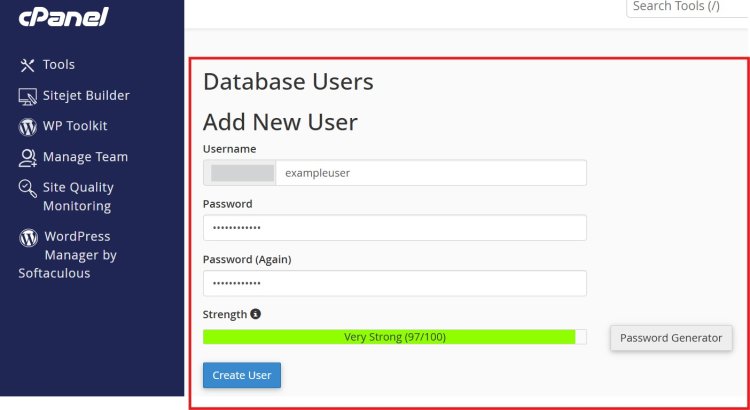
Step 1: When you scroll down in Manage Databases, you’ll be prompted to create a database user.
Step 2: Enter a username and a strong password.

Step 3: Confirm the password and click Create User.Note: It’s crucial to use a unique password to enhance security, as this protects your database from unauthorized access.
Assigning Permissions to Database User
Permissions define what actions a user can perform on a database. In the Wizard:
-
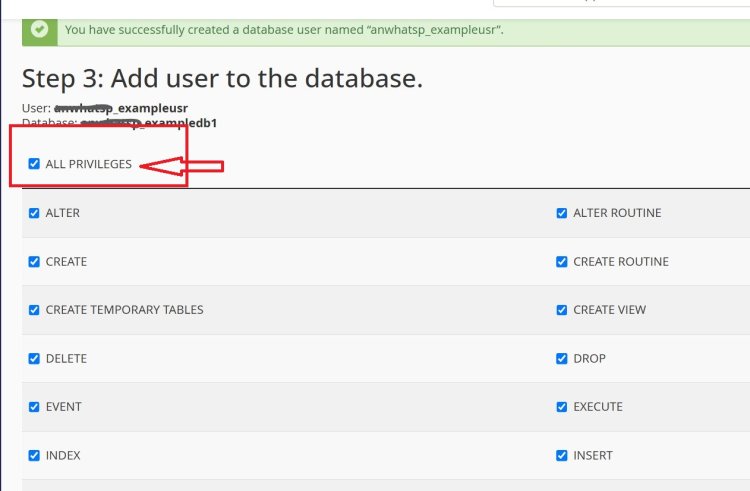
Select the permissions for the user—”All Privileges” option is usually chosen for a primary user
-
Click Make Changes to apply the permissions.

How To Create Database And User Through Database Wizard
You can also create a Database and user through Database Wizard in cPanel. And it's even easier as compared to Manage Database Option.
Step 1: Go to Databases Section in cPanel Dashboard.
Step 2: Click on Database Wizard.
Step 3: Enter a desired database name and click on Next Step
Step 4: Now you'll be prompted to create Database User.
Step 5: Enter a good username and a strong password. Re-enter the password to confirm. And click on Next Step
Step 6: Now Add user to the database. Select ALL PRIVILEGES And Click on Make Changes.
How to Create a MySQL Database and User Through the Command Line
In addition to using cPanel, you can also create a new MySQL database and user directly through the command line. This is a powerful method, especially for developers who prefer a hands-on approach or manage databases on remote servers. Below is a step-by-step guide on how to create a new database in MySQL and add a user with specific permissions.
Step 1: Access MySQL Command Line
To begin, log in to your server via SSH. Once connected, access the MySQL command line with the following command:
mysql -u root -p
-
Replace root with your MySQL root username (or another user with administrative privileges).
-
After entering this command, you’ll be prompted to enter your MySQL password.
This will allow you to access the MySQL environment where you can create databases, add users, and manage database privileges.
Step 2: Create a New MySQL Database
Once logged into the MySQL command line, create a new database by entering the following command:
CREATE DATABASE database_name;
-
Substitute database_name with a name that’s easy to identify. Naming conventions like app_db can help.
This command is an easy way to create a new database in MySQL without needing to access the cPanel.
Step 3: Create a New MySQL Database User
After creating the database, you’ll need to create a new MySQL database user. To do so, enter:
CREATE USER 'username'@'localhost' IDENTIFIED BY 'password';
-
Replace username with the new user's name.
-
Substitute password with a strong password for security.
Tip: The localhost portion restricts this user to connect only from the server itself. If you require remote access, you can replace localhost with % (or a specific IP address).
Step 4: Grant Privileges to the New User
Now that you have a new MySQL user, grant them the required permissions to manage the database:
GRANT ALL PRIVILEGES ON database_name.* TO 'username'@'localhost';
This command will add the user to the database with full privileges, allowing them to perform all necessary tasks, from inserting data to running updates. If you want more control, replace ALL PRIVILEGES with specific permissions like SELECT, INSERT, or UPDATE as needed.
Run this command to apply the changes:
FLUSH PRIVILEGES;
Using FLUSH PRIVILEGES ensures that MySQL reloads all granted permissions immediately.
Step 5: Verify the Database and User
To confirm the creation of the new database and user, use the following commands:
SHOW DATABASES;

SELECT user FROM mysql.user;
This will list all existing databases and users, confirming that the new database and user are active.
Step 6: Exit MySQL Command Line
Once you’ve completed the setup, exit the MySQL command line by typing:
EXIT;
That’s it! This method is a straightforward way to create a MySQL database with a user entirely through the command line. This process allows for quick and efficient database management, especially useful when working directly on a server.
Connecting MySQL Database to Your Website
Once your database and user are created, connect them to your website:
-
Update your website configuration file with database details:
-
Database Name
-
Username
-
Password
-
Database Host (usually "localhost")
-
Test the connection to confirm everything is working smoothly.
How to Manage Databases in cPanel
From time to time, you may need to manage your databases. In cPanel:
-
Renaming a database can be done in phpMyAdmin by exporting and reimporting under a new name.
-
Deleting a database can be done through the MySQL Databases section by simply selecting the database and clicking Delete.
Adding and Removing Users from MySQL Databases
Additional users can be added if needed:
-
Navigate to MySQL Databases in cPanel.
-
Select the database and choose Add User to Database.
-
For removal, click on Delete User from Database without affecting the stored data.
Backing Up Your MySQL Database in cPanel
Backing up your database is crucial to avoid data loss:
-
Go to Backup in cPanel.
-
Select Download a MySQL Database Backup and choose your database.
Regular backups ensure you’re prepared for unexpected issues.
Common Errors and Troubleshooting in MySQL Databases
Working with MySQL databases is essential, but even the most seasoned developers encounter errors from time to time. Here’s a rundown of some common MySQL errors, along with simple troubleshooting steps to get you back on track.
1. Error: “Access Denied for User”
This error occurs when MySQL denies access to a user due to incorrect login credentials or insufficient privileges.
Solution: Double-check the username and password, ensuring they match what you set up. If you're certain the credentials are correct, make sure that the user has the necessary privileges to access the database by using:
GRANT ALL PRIVILEGES ON database_name.* TO 'username'@'localhost';
FLUSH PRIVILEGES;
-
Additionally, verify that the user is allowed to connect from the specific host (often localhost or % for any host).
2. Error: “Can’t Connect to MySQL Server”
This message appears when the MySQL server isn’t accessible. It could be due to server downtime, incorrect IP, or firewall issues.
Solution: Confirm that the MySQL service is running. You can restart it by using:
sudo service mysql restart
-
If you’re working remotely, check that the IP address is correct and that the firewall settings allow external connections to the MySQL port (default is 3306).
3. Error: “Unknown Database”
This error occurs when you try to access a database that doesn’t exist, either due to a typo or because it hasn’t been created yet.
Solution: Confirm the database name is correct by listing existing databases:
SHOW DATABASES;
If you don’t see the database you need, create it using:
CREATE DATABASE database_name;
4. Error: “Table Doesn’t Exist”
This error means MySQL cannot locate the specified table in the database.
Solution: Ensure that the table name is spelled correctly and that it exists by running:
SHOW TABLES IN database_name;
-
If the table has been deleted or wasn’t created yet, you’ll need to recreate it or restore it from a backup.
5. Error: “Out of Memory”
MySQL can sometimes run out of memory, especially on low-resource servers or when handling large datasets.
-
Solution: Check available server memory and consider upgrading your hosting plan if you’re constantly running into memory issues. You can also adjust MySQL settings in the my.cnf file, reducing cache and buffer sizes to use memory more efficiently.
6. Error: “Syntax Error in SQL Query”
This error happens when there’s a mistake in your SQL syntax—common for beginners or when typing complex commands.
-
Solution: Double-check your SQL query syntax. MySQL usually highlights the error position, so pay attention to where it indicates the issue. Reference MySQL documentation to ensure correct syntax.
7. Error: “Lock Wait Timeout Exceeded”
This error occurs when a query waits too long to obtain a lock on a table or row, often due to high database traffic.
Solution: Identify and optimize any long-running queries to prevent bottlenecks. Increasing the lock timeout setting in my.cnf (by adjusting innodb_lock_wait_timeout) may also help in some cases:
innodb_lock_wait_timeout = 50
-
Remember to restart MySQL for configuration changes to take effect.
8. Error: “Too Many Connections”
This error indicates that the number of simultaneous connections to the MySQL server has exceeded the limit.
Solution: Try closing unnecessary connections or optimizing your database queries to reduce load. You can also increase the maximum allowed connections in your MySQL configuration by updating my.cnf:
max_connections = 200
-
After modifying this value, restart MySQL to apply the change.
9. Error: “MySQL Server has Gone Away”
This is a common error if a query takes too long to execute, exceeding MySQL’s wait timeout limit.
Solution: Increase the timeout limit in my.cnf by adjusting wait_timeout:
wait_timeout = 600
-
If the issue persists, consider optimizing your queries to reduce execution time.
10. Error: “Database Disk Space Full”
If your database reaches its storage limit, you may encounter this error, which prevents further data storage.
-
Solution: Free up space by deleting unnecessary data or tables and clearing logs. Consider upgrading your storage plan or database server if you regularly run into space issues.
By keeping these common errors and troubleshooting tips in mind, you’ll be well-prepared to handle most MySQL issues. Troubleshooting may feel daunting initially, but with practice, you’ll quickly master diagnosing and resolving errors efficiently.
Best Practices for MySQL Database Security
Securing your MySQL database is essential to protect sensitive data and maintain a stable, trustworthy site. Here are a few fundamental security practices to keep your database safe from unauthorized access or data breaches.
1. Use Strong Passwords and Unique Usernames
The first line of defense for your MySQL database is a strong password and a unique username for each user. Avoid default usernames like "root" and opt for complex passwords with a mix of uppercase and lowercase letters, numbers, and symbols. A strong password adds an extra layer of protection against unauthorized access.
2. Limit User Privileges to Essential Functions Only
Assigning the least privilege principle is crucial. Grant users only the permissions they absolutely need to perform their jobs. For instance, if a user only needs to read data, limit their privileges to SELECT rather than granting full access. Reducing permissions lowers the risk of accidental changes or malicious activity on the database.
3. Regularly Back Up Data and Monitor for Unauthorized Access
Regular backups are critical for data protection, allowing you to recover your database in case of an attack, accidental deletion, or corruption. Set up automated backups and store them securely. Additionally, keep an eye on access logs for unusual activity, such as unexpected login attempts or unauthorized queries.
4. Keep MySQL Updated
Staying updated with the latest MySQL version is key to securing your database. Updates often include important security patches and improvements that guard against vulnerabilities and exploits. Regularly check for updates and apply them promptly.
Conclusion
Creating a MySQL database and user in cPanel is straightforward when using the MySQL Database Wizard or phpMyAdmin. With a secure setup, you ensure that your data remains safe and accessible. Regular backups and mindful user permissions are essential for ongoing maintenance.
FAQs
1. How many databases can I create in cPanel?
-
It depends on your hosting plan; many plans allow unlimited databases, but always check your specific plan for limits.
2. Can I delete a user without deleting the database?
-
Yes, you can remove a user from a database without affecting the data. Simply go to the MySQL Databases section and delete the user from the assigned database.
3. How do I reset a MySQL database password in cPanel?
-
To reset a password, go to the MySQL Databases section, locate the user, and update the password.
4. What’s the best way to optimize my MySQL database?
-
Regularly use tools like phpMyAdmin to optimize tables and clean up unnecessary data to keep performance smooth.
5. Is it safe to give all privileges to a database user?
-
Only for primary users or administrators; for others, limit permissions to ensure security.
