How to Create a Database in XAMPP: Step-by-Step Guide
Setting up a database in XAMPP is a crucial step if you’re developing PHP applications locally. XAMPP, with its built-in MySQL database (now known as MariaDB), makes it easy to create, manage, and connect to databases right from your local server.
In this guide, we’ll walk you through everything from launching XAMPP to creating and managing a MySQL database. Let’s dive in and get your local development environment set up!
Why Use XAMPP for Databases?
If you’re new to local development, you might be wondering why XAMPP is so popular. Here’s the deal: XAMPP provides all the core components of a web server in one place, including Apache (to serve PHP files), MySQL (for databases), and PHP itself.
Setting it up means you can test and develop your PHP applications right on your own computer without needing a live server. So, whether you’re working on personal projects, learning PHP, or creating a prototype, XAMPP makes it easy to handle databases and test code locally.
Step 1: Download and Install XAMPP
To start using XAMPP, you’ll first need to download and install it on your system. For a comprehensive setup guide, check out this step-by-step tutorial on creating and running PHP files with XAMPP.
-
Download XAMPP – Go to the Apache Friends website and select the version that matches your operating system.
-
Run the Installer – Open the downloaded file and follow the installation prompts, keeping default settings if you’re new to XAMPP.
-
Launch the Control Panel – Once installed, open the XAMPP Control Panel to access the features.
Step 2: Start MySQL and Apache in XAMPP
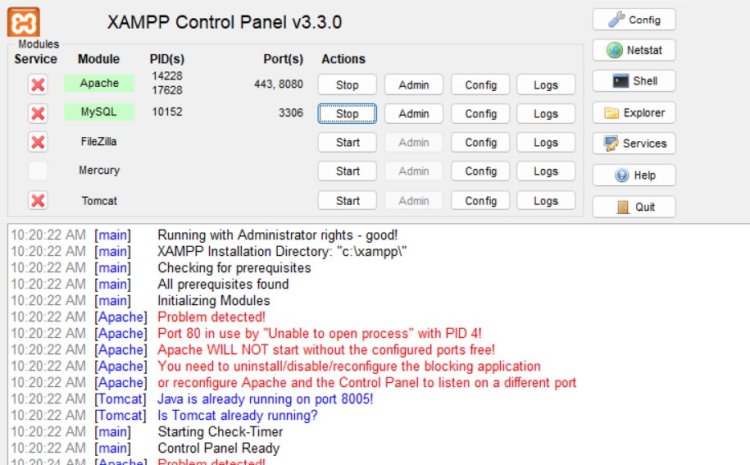
To work with databases in XAMPP, you’ll need to start the Apache and MySQL services:
-
Open the XAMPP Control Panel.
-
Click Start next to both Apache and MySQL. These services need to be running to create databases and run PHP files.
Step 3: Access phpMyAdmin to Manage Databases
Now that MySQL is running, you can manage your databases using phpMyAdmin—a user-friendly interface bundled with XAMPP.
-
Open your web browser.
-
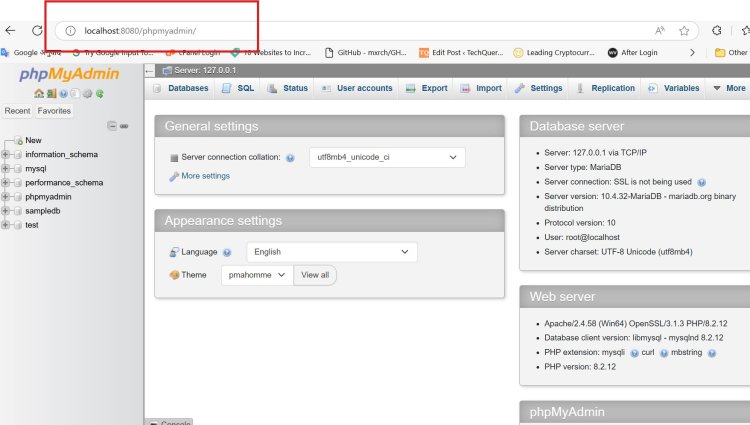
Type http://localhost/phpmyadmin (or http://localhost:8080/phpmyadmin if you’re using port 8080) into the address bar.
-
Press Enter, and you’ll see the phpMyAdmin dashboard. This is where you’ll create, view, and manage your databases.
Step 4: Create a New Database
Ready to set up your first database? Let’s go through it step-by-step.
-
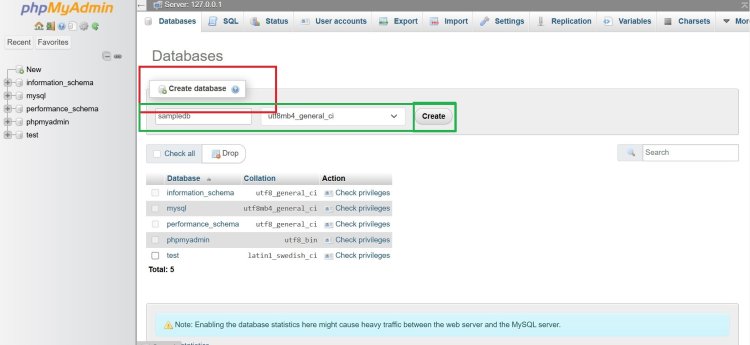
In phpMyAdmin, click on the "Databases" tab at the top.
-
In the “Create database” field, enter a name for your database, such as test_database.
-
Choose a collation—most commonly, utf8_general_ci works well for general-purpose applications.
-
Click Create.
You’ve just created a new MySQL database in XAMPP! You’ll see it listed on the left sidebar, where you can click to manage tables, add data, and run queries.
Step 5: Set Up Database Tables and Structure
Databases are empty until you define tables. Here’s how to start structuring your database:
-
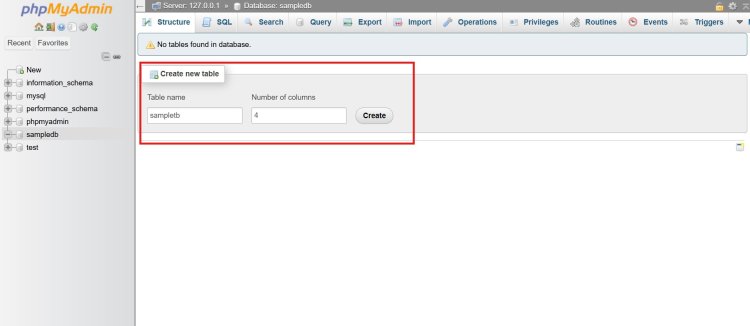
Select your newly created database from the sidebar in phpMyAdmin.
-
Enter a name for your table, such as users, in the “Create table” section.
-
Specify the number of columns your table should have, then click Create.
-
Define each column’s name, data type, and attributes (e.g., username as VARCHAR for text, id as INT for integers).
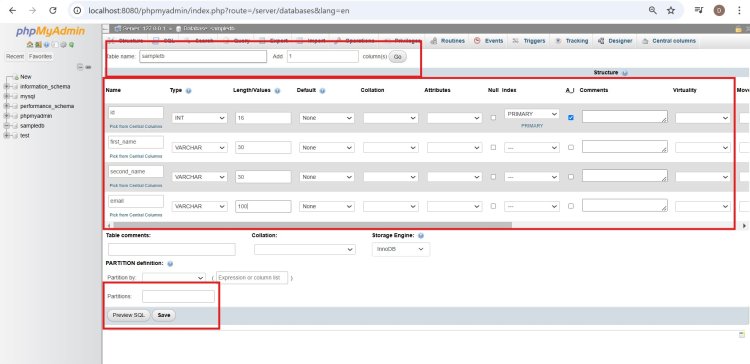
Once you click Save, phpMyAdmin will create the table structure in your database.
Step 6: Connect Your PHP Code to the Database
After creating a database in XAMPP, the next step is to connect your PHP code to it, allowing you to store, retrieve, and manipulate data from your application. This connection is essential for any database-driven PHP application, as it facilitates interaction between your code and the database.
Where to Place the PHP Code
-
Create a New PHP File:
- Open your code editor and create a new file. Name it something like
db_connect.phpto keep it clear. - Save this file inside the
htdocsfolder in your XAMPP directory. On Windows, the path is typicallyC:\xampp\htdocs\, and on macOS or Linux, it’s usually/opt/lampp/htdocs/.
- Open your code editor and create a new file. Name it something like
-
Write the Connection Code:
- In
db_connect.php, add the following PHP code to establish a connection to your database:
- In
<?php
$host = "localhost";
$dbname = "test_database"; // Replace with your database name
$username = "root"; // Default username in XAMPP
$password = ""; // Default password in XAMPP is blank

try {
    // Create a PDO instance (connect to the database)
    $dsn = "mysql:host=$host;dbname=$dbname";
    $pdo = new PDO($dsn, $username, $password);

    // Set PDO error mode to exception to handle any connection errors
    $pdo->setAttribute(PDO::ATTR_ERRMODE, PDO::ERRMODE_EXCEPTION);

    echo "Connected successfully!";
} catch (PDOException $e) {
    // If connection fails, display an error message
    echo "Connection failed: " . $e->getMessage();
}
?>
Explanation of the Code
- Server Name:
"localhost"refers to your local server where XAMPP is running. - Username and Password: By default, XAMPP uses
rootas the username and an empty password for MySQL. - Database: Replace
"test_database"with the name of your actual database (the one you created in Step 4). - Connection Check: The
if (!$conn)line checks if the connection was successful. If not, it displays an error message.
Running the Script
To run this script and test the connection:
- Open Your Browser.
- Enter the URL: Type
http://localhost/db_connect.php(orhttp://localhost:8080/db_connect.phpif using port 8080) into the browser’s address bar and hit Enter. - Check the Output:
- If successful, you should see the message “Connected successfully!” in your browser.
- If there’s an error, the script will display an error message, helping you diagnose connection issues (e.g., incorrect database name, username, or password).
What This Connection Script Does
This script establishes a link between your PHP application and the MySQL database. Once the connection is successful, you can use the $conn object to execute SQL queries, retrieve data, and handle any database-related operations within your PHP files. This setup is fundamental for building dynamic, data-driven applications.
By keeping this connection script in a separate file (db_connect.php), you can also reuse it in other parts of your application by including it in any PHP file with include 'db_connect.php';. This makes your code modular and easier to maintain.
Troubleshooting Common Issues
-
Error: Port 80 in Use
If Apache fails to start due to port conflicts (such as “Port 80 in use”), change Apache’s port in the XAMPP settings or close conflicting applications like Skype. -
Error: phpMyAdmin Can’t Connect
Ensure that MySQL is running in the XAMPP Control Panel. If you still encounter issues, restart XAMPP and try again. -
Access Denied Errors
If you encounter “Access Denied” messages, double-check that your username and password in PHP match those in phpMyAdmin. By default, root with an empty password is used.
Conclusion
Creating and managing a MySQL database in XAMPP is a straightforward process, especially with phpMyAdmin at your fingertips. Now that you’ve set up your local database environment, you can experiment with database structures, create tables, and start building PHP projects confidently. XAMPP’s ease of use makes it an excellent choice for beginners and experienced developers alike. Now it’s time to dive in, test your skills, and bring your projects to life right on your computer!
FAQs
1. How do I start MySQL in XAMPP?
In the XAMPP Control Panel, click Start next to MySQL. Ensure that MySQL’s status changes to green, indicating it’s running.
2. How do I open phpMyAdmin in XAMPP?
Go to your browser and type http://localhost/phpmyadmin (or http://localhost:8080/phpmyadmin if you’re using port 8080) to access phpMyAdmin.
3. Do I need to start Apache to use phpMyAdmin?
No, you only need to start MySQL to access phpMyAdmin. However, starting Apache is necessary for running PHP files in your local environment.
4. Can I create multiple databases in XAMPP?
Yes, you can create as many databases as needed. Use the "Databases" tab in phpMyAdmin to create and manage additional databases.
5. How do I reset my phpMyAdmin password?
In phpMyAdmin, click on the “User accounts” tab and select “Edit privileges” for your account. Here, you can update your password, ensuring it matches any credentials used in your PHP files.
